![]()
In Introducing Workgroup Manager we defined common terms, and became familiar with navigating the Workgroup Manager interface. In the second piece in the series on Workgroup Manager I will provide a step by step guide to 3 of the most common Workgroup Manager tasks: Creating a new user, adding a new computer to the directory, and managing preferences. Before continuing on to Workgroup Manager Best Practices, and Basic troubleshooting in parts 3 and 4.
Hit the link for Workgroup Manager: A Step by Step Guide to Common Mac OS X Server Tasks
Creating a New User:
In any modern environment be it a school, non-profit, or enterprise a System Administrator will often find themselves with new clients that need access to the network. Workgroup Manager (WGM) makes it easy to add a new user your Open Directory (OD) database.
1. Connect to Workgroup Manager by launching the WGM application, and entering your directory credentials. Remember, these are typically different than your server admin login and often use the diradmin account. By default, you are presented with the Accounts and Client view.
2. Click the new user button found in the top right side of the toolbar. This will create a new user and allow you to edit their information on the right inspector pane.
3. Enter the account name, and a shortname will automatically be created. If you’d like, you may add additional shortnames or edit the one provided. Next up is the User ID which is the numerical identifier to the account within the database. As will be discussed in the Workgroup Manager: Best Practices article, User IDs are a great way to keep your database organized.
4. Finally, enter your default password in both fields and click save. Thats it! You’ve added a user to your Directory System. That was easy enough, so lets delve into some of the more advanced control you have over accounts. Along the top tab bar in the inspector pane go ahead and click the advanced tab.
5. Here you begin to get into the more advanced functionality that WGM offers. What I’d like to highlight for a moment is the “Options…” button below the User Password Type.
6. This is where you can set the password policy for an account. Disabling an account on a specific date is a good security control for a temporary employee, or perhaps a substitute teacher and disabling after a certain number of failed attempts can help defend against a “Bruce Force” attack on an account. More importantly you can set your minimum password policies here with automatic reset prompts, minimum characters, and force a password change on the next login. This last one is particularly useful after first creating an account with the default username and password.
7. The Groups tab is where you set well, any group memberships. This window introduces a different interface dynamic that is repeated throughout the application. By clicking the grey plus beside the other groups table you open a drawer on the side of the WGM window. From here you can drag the necessary groups (Shit & Command click work) into the other groups field to make assignments. The account with inherit all relevant preferences and settings from the assigned groups, but more about that later.
8. The next tab is the “Home” tab, and here is where you can create and assign disk quotas (maximum size of the home) for the accounts home directory. The directories that show up here are those bound to and defined by your open directory system.
9. The next tabs allow you to tie your user account to an OS X “Squirrel Mail” email account if you use that system, and the print quota can set limits to the amount of pages printed per day. Simple and self explanatory.
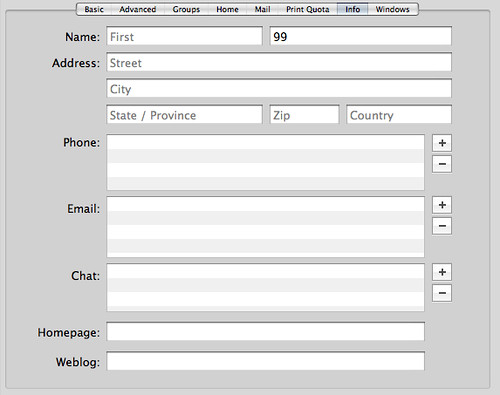
10. The info tab is underutilized in my opinion, and allows you to add a lot of functionality to your OD system. By taking the time to put this information into your directory system you can log into it with Address Book and propagate their address book cards.
11. The last tab is the Windows tab, and it allows you to setup the user account so that it can be accessed from a (cough…) windows box.
Adding a New Computer to the Directory
Although managing your user accounts may be the most obvious use for an Open Directory system and Workgroup Manager, it is certainly not the only use. Arguably managing your computers is just as valuable a feature.
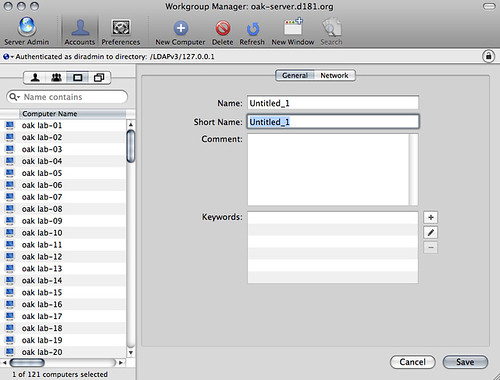
1. There are only two steps required to add a computer to your network. First, if you look at the blue circle with the white plus in the toolbar you should notice that it changed from New User, to New Computer. Go ahead and press it. Then place the name of the computer, and a different short name if you’d like (I don’t find the short name to be a particularly useful feature, but if you’ve got a good use for it let me know in the comments.)
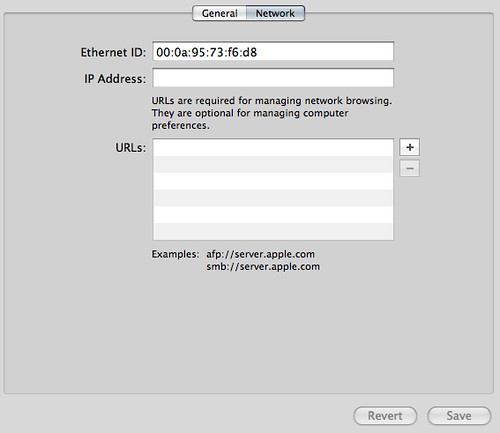
2. The final step is critical when adding a computer to the Open Directory system. Click on the network tab, giving you 3 fields. The ethernet field needs to have the Ethernet ID or MAC Address as this is how the directory system locates and identifies the machine. Note, it sometimes seems counter-intuitive but even if the computer will only be connecting to the network wirelessly, for example a notebook computer, it still must be the Ethernet ID and not the Airport ID. The other fields allow you to control how the computer sees the network, and is optional.
Managing Preferences:
The aspect of Workgroup Manager that will likely consume the largest amount of time is adjusting preferences to control the user experience. With WGM you can do anything from controlling a user’s dock to blocking access to certain applications. It would take a lot more time then I have right now to go over each and every preference so instead we will go over the fundamentals of managing preferences.
The most critical piece of information you need to learn is the priority of preferences, the order of which preferences are applied.
Users > Computers > Computer Group > Workgroups
Users are greater than Computers which are greater than Computer Groups which are greater than Workgroups. This means that if the same preference is managed in multiple places the system will defer to the highest level. For example, lets say all members of the 1st grade workgroup are managed and only have access to Type to Learn and Safari but the regular computer lab is closed for maintenance causing them to use the computer graphics lab instead. The computer graphics computer list is managed so that Adobe Photoshop is on the dock of all computers in the group. Since computer groups get priority over workgroups this means that your workgroup preference saying that 1st graders only get Type To Learn and Safari will be overwritten and the students will see Type To Learn, Safari, and Adobe Photoshop. This could cause confusion for the teacher, and certainly for the students and would not be the best way to handle this situation. Instead, you could have created a Computer Graphics Workgroup and placed the preference to have Photoshop on the dock there.
Another example would be that all groups are managed to limit their access to applications such as Skype, except for lab assistants who are setup with access in their user preferences because it is used to communicate to the tech department. We will look into this concept again in the next article discussion of best practices.
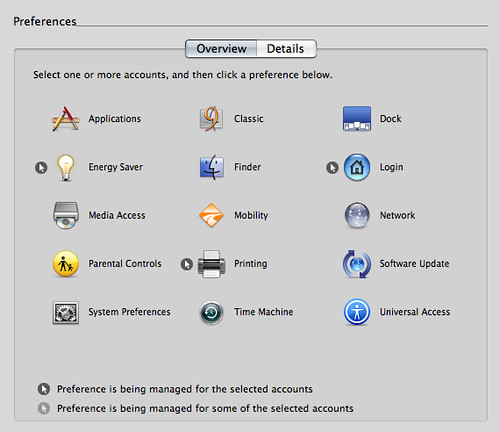
Actually managing preferences is in itself very easy, but it requires thought and planning to control problems such as the one described above. In order to manage any preference you first need to select for what user, group or computer you want to manage. Do this by returning to the left side of the interface, and using the tab bar across the top choose what type of record you want to edit. Once you’ve chosen the record type, chose a specific record from the list on the left. Then across the top toolbar, click on the preferences icon which will bring up the preference pane shown above.
Clicking on each icon will bring up a list of options specific to each preference type. For example, applications will allow you select specific apps to allow or deny the record access to. The “System Preferences” preference does not actually give you access to manage system preferences but allows you to control access to those system preferences by the record type e.g. you could eliminate teachers access to the software update preference, or the network settings. Once you manage a preference, the gray and white mouse icon appears next to the preference as a visual reminder.
The last concept to recognize when managing preferences is the “Never, Once, Always” option. Across the top of each specific preference you have radio buttons with the above options. These control how the preferences are applied. Never of course means that the preference is not managed for that particular record. Once, means that the preference will only be applied upon the records next login and after that access will be returned. This is a great way to add an app to the dock, while still giving the user the ability to remove that item later. Setting the preference to Always means that your settings will always apply and cannot be overridden by the user.
As you can see, managing preferences can be a very complicated endeavor. However with good planning and a firm understanding of the two concepts discussed above you can help reduce any conflicts, and avoid any confusion for the end user.
Be sure to check back next week for my article on Workgroup Manager: Best Practices, and the final article in this series Workgroup Manager: Basic Troubleshooting. Thanks, and be sure to post any questions or comments in the comments section below.
By Eric Danley


